There are many ways of hosting a Minecraft server on a virtual machine from running a simple vanilla server jar file to a fully custom spigot/paper server with various plugins. We can even create a bungeecord network that proxies multiple Minecraft server instances.
The aim of this post is to easily deploy a Minecraft server on Google Compute Engine by reducing the manual setup required on the VM. We can use a prebuilt docker image for Minecraft from the docker hub to do the same.
itzg/minecraft-server is a fully customizable public image that makes deployment easier. The full documentation about using the image can be found on its GitHub repository.
Let's get started
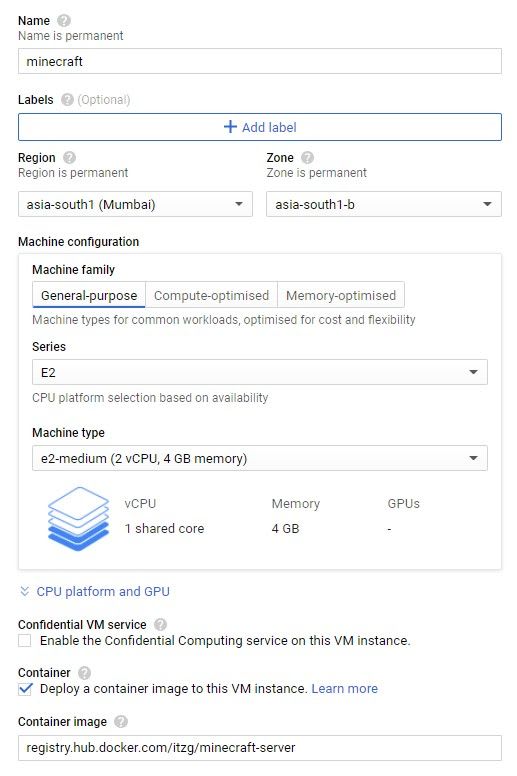
Create a project on GCP and open Compute Engine page from the navigation menu. Click on create an instance and check the deploy a container image to this VM checkbox. Use the following settings:
Name: minecraft
Machine Type: e2-medium
Container Image: registry.hub.docker.com/itzg/minecraft-server
We will need to mount a volume to the docker container so that we can retain container data (in this case, our Minecraft world data) when the container/VM restarts.
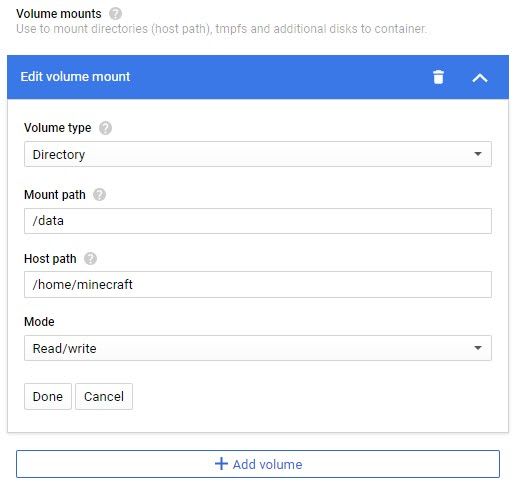
For this docker image, we can mount the /data container path to the /home/minecraft host path on the VM.
We can customize the server by setting container environment variables, the full list of environment variables can be found from the image documentation.
Set the following environment variables:
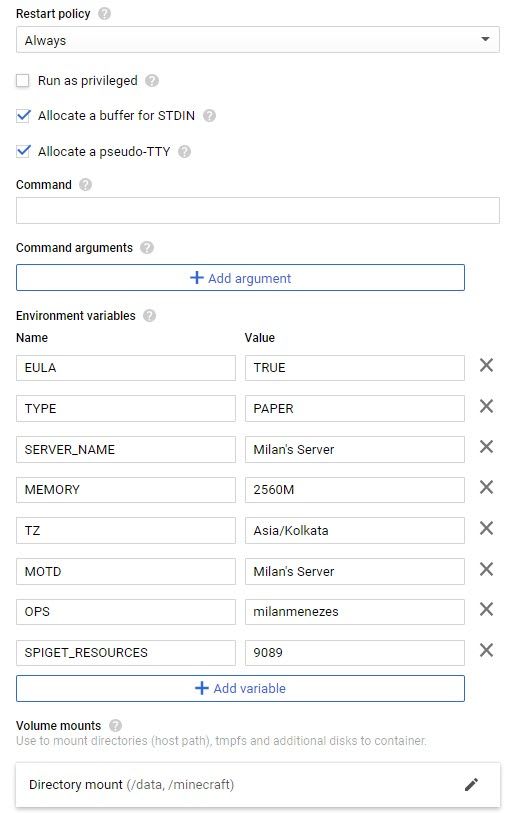
The only requirement to start the server is to set the EULA environment variable to TRUE, all other environment variables are optional.
I have chosen the server type to be PAPER, Paper is an optimized fork of Minecraft. Paper contains numerous improvements and optimizations resulting in a significant increase in performance. You can read more about the Paper server at papermc.io.
The memory here refers to the java heap size. This should be set to 3/4th of the total memory available for Minecraft.
Spigot plugins can be installed by setting the SPIGET_RESOURCES environment variable with comma-separated values of plugin numbers (available from the spigot plugin URL). Other plugins/mods can be installed by setting the MODS environment variable.
Create the VM and copy the external IP address, we will use this address in the Minecraft client to connect to the server. This address is ephemeral, you can reserve that address as a static IP address to avoid IP changes during VM restarts.
By default, all egress from GCE VMs is allowed but ingress is blocked. We will need to enable the ingress on Minecraft port 25565 for this VM. To do that, set a network tag on the VM that we can target when creating the firewall rule.
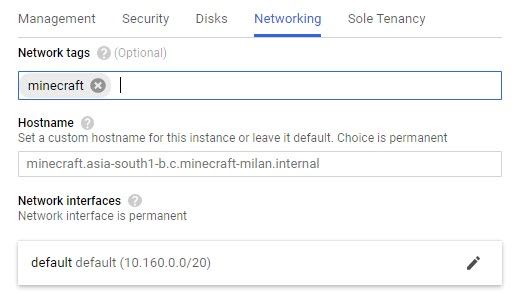
Navigate to the VPC Networks from the navigation menu and click on the default VPC. Under firewall rules, create a new firewall rule to allow ingress for TCP traffic on port 25565 from all IP addresses i.e 0.0.0.0/0
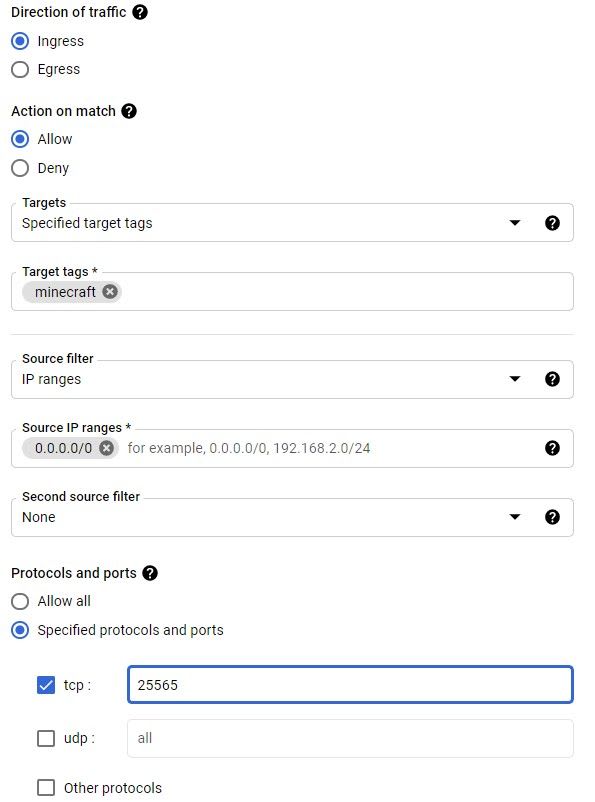
After creating this firewall rule, you should be able to connect to the server using the external IP address of the VM from anywhere on the internet.
Cost Savings
If you don't want the server to run 24/7, you can schedule the VM to start and stop at specified timestamps every day/week using the instance schedules on the compute engine page.
Turn on preemption on the VM (reduces costs by 80%). Preemptive VMs can be stopped by GCP when the zone needs to free up capacity to serve other customers. Preemptive VMs lasts for a maximum duration of 24hrs. When the VM gets preempted, it will be in a stopped state and we will need to start the VM.
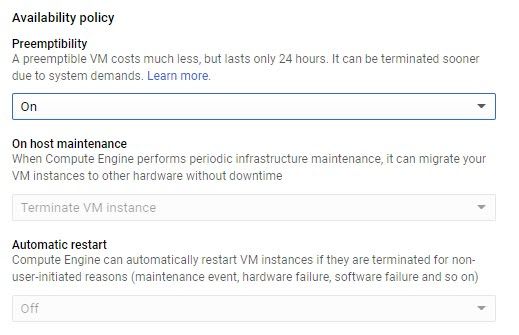
You can also save costs by using the ephemeral IP address instead of the static IP address. If you want a domain name to always point to the current ephemeral IP address, you can use Cloudflare to manage DNS and call the Cloudflare rest API from the VM startup script to set the IP address on the DNS record. By default, containers run on COS, if we choose to use ubuntu, we can also use a DDNS client within the VM.
If you don't want to schedule the VM and would like to manually start/stop the VM, you can set up Cloud Functions to start and stop the VM. You can bookmark the function trigger URLs. This way, you can start and stop the VM by clicking on the bookmarks instead of visiting the GCP console.
